S-Param: Various indicators… ILFit, ILD, ICN, ICR, IMR, INEXT, PQM, RQM…

S-Parameter:

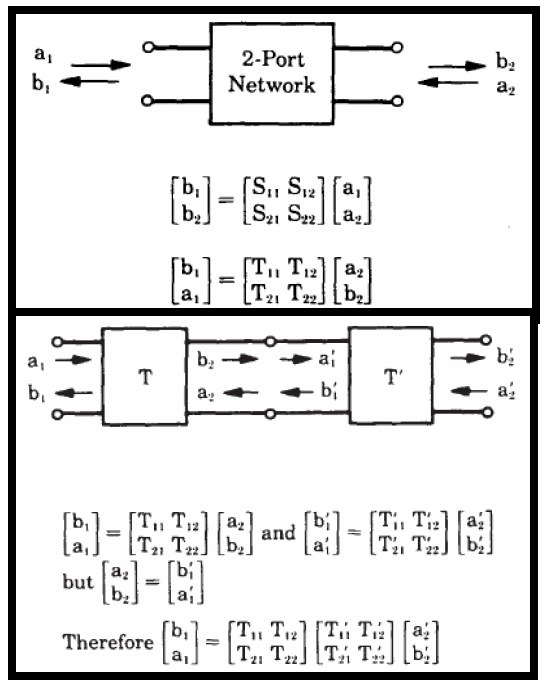
In modern channel design, scattering parameters (S-param) is a commonly used to represent passive interconnects. A S-param model is basically a power view (i.e. incidental and reflective) of each “port” under certain reference impedance at various frequencies. So its format is like a frequency dependent matrices each with dimensions equivalent to the square number of ports. In a college text-book, a two port network is usually used to explain these incidental/reflective relationships. Using linear algebra, different form (Z, Y, T, ABCD etc) may also be calculated to be used in different scenarios. One can also cascade two or more S-param. together to form a consolidated S-param model.

For example, a typical SERDES channel is usually in point-to-point topology. So stages of various interconnects may be cascaded into a single S-parameter.

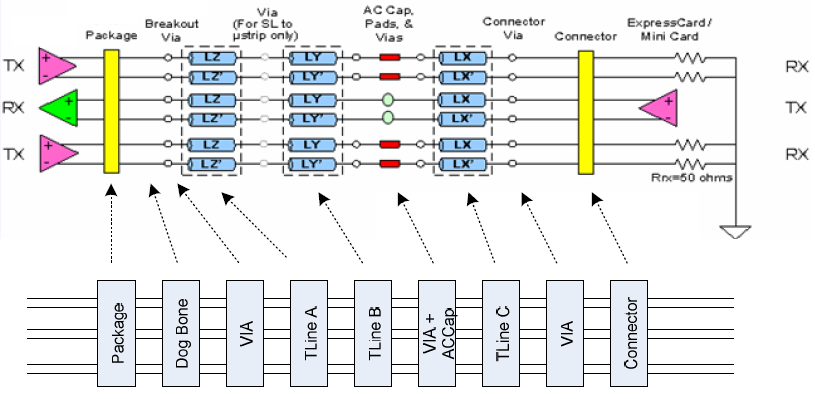
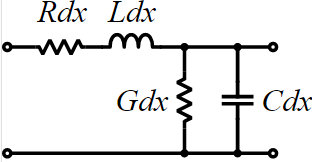
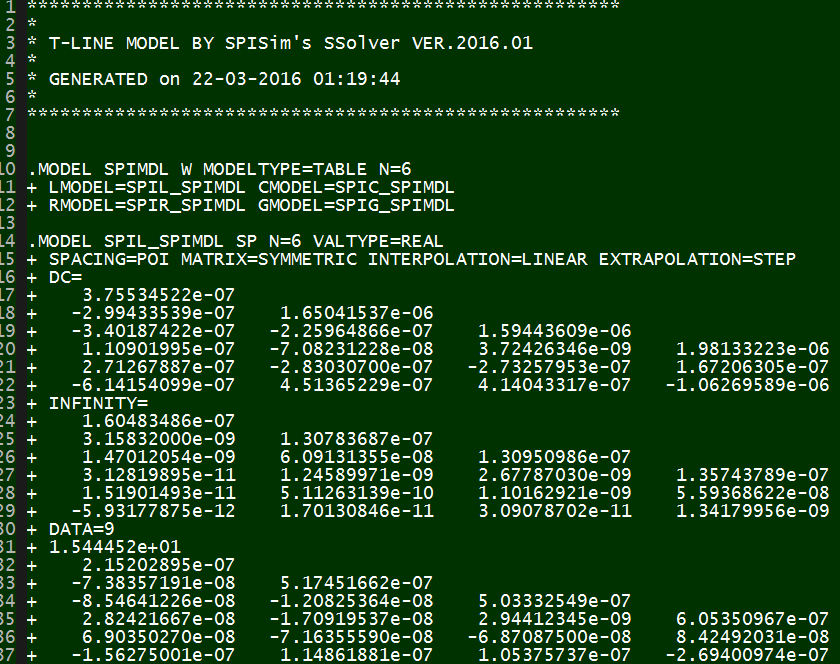
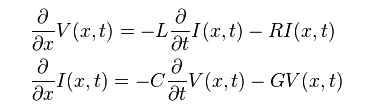
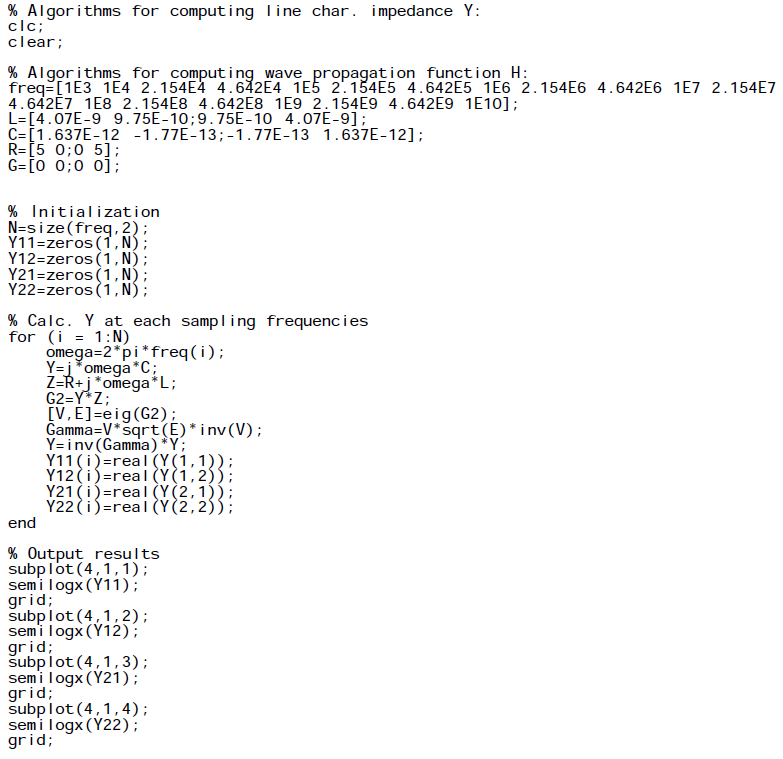
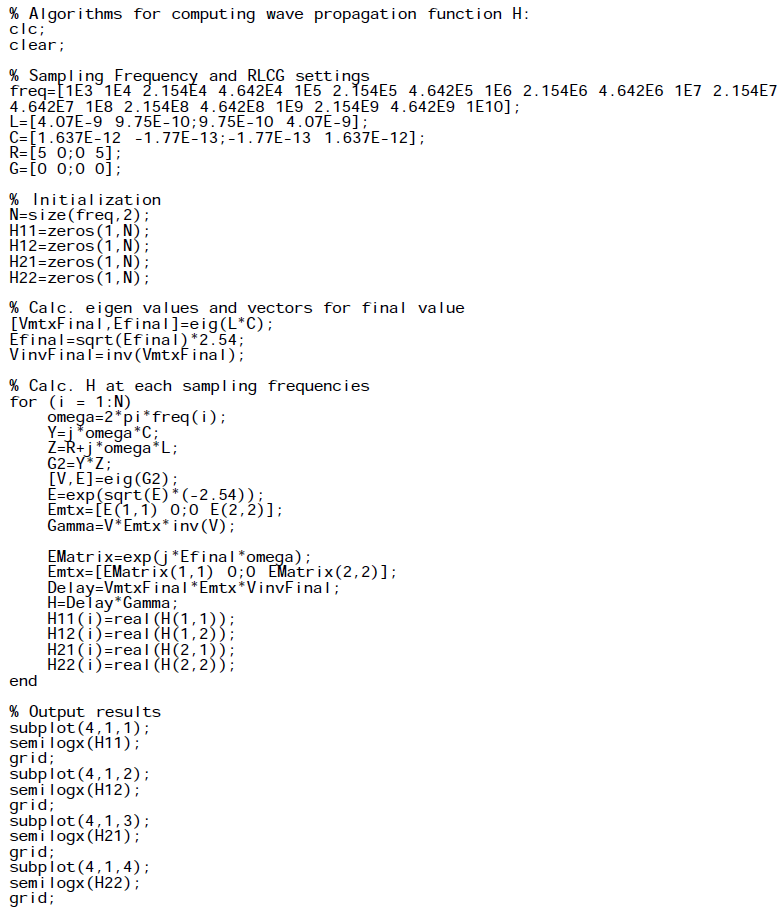
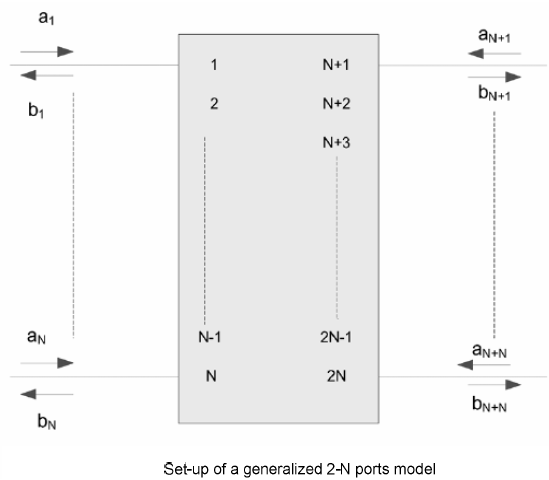
Usually an 3D field solver tool like HFSS/Q3D etc will extract physical design into a S-parameter.  For a homogeneous interconnect such as transmission line, 2D/2.5D field solver can be used to extract their RLGC/tabular model data. These RLGC data can easily be converted to corresponding S-parameters. So essentially all these stages’ device model can be in S-param. format and cascaded together. However, when there are more than two ports on each side… such as the schematic shown above, the basic two-port network formulas need to be “generalized” so that plain S/Z/Y/T/ABCD conversion formula can still be applied. That is, the ports needs to be arranged in such a way so that a “generalized 2-N ports” can be formed:

As a S-parameter is passive in nature and represent “power” data, its value or “decay” can be viewed in dB scale and considered as a type of “loss” (compare to 0Hz origin, or 0dB). Depending on the incidental (through-type) or reflective relationship between each ports, different part of S-param may be viewed as “insertion loss (IL)” or “return loss (RL)” from near end (NE) or far-end (FE):

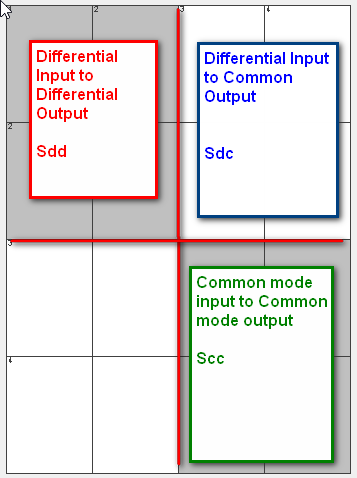
The notation above is for a “single-ended” s-param. To describe a differential channel, a “differential-mode” or “mixed-mode” conversion need to be applied. The forming  of “differential” relationship is essentially to subtract certain element in the S-param’s matrix which represents the “return” path or return channel. The resulting S-parameter can thus be used to describe relationship between “modes” such as differential mode or common mode:

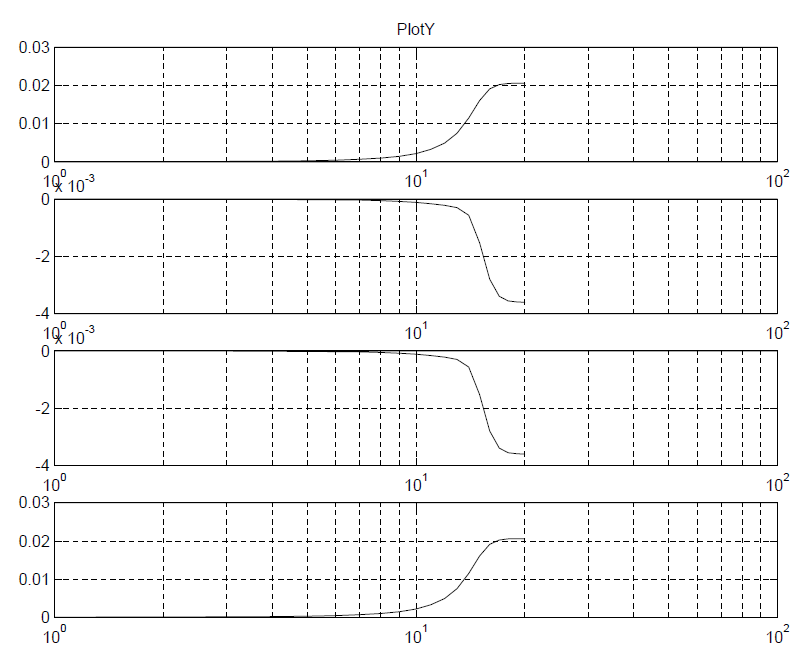
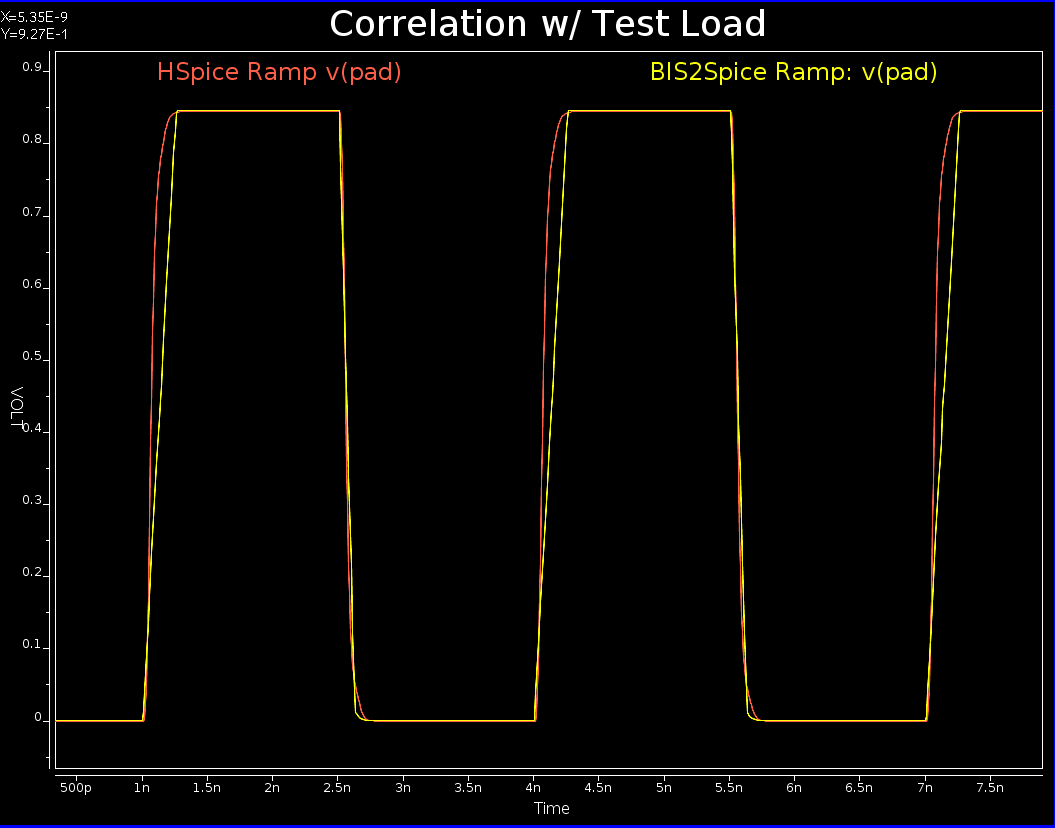
As one can see, a s-parameter is so “versatile” in describing interconnect’s properties yet its data is non-intuitive complex numerical matrices, an usual or traditional way of checking a s-param’s quality is to visualize its data and “eye-balling” to correlate to model data from previous design revision or results from different extractors:

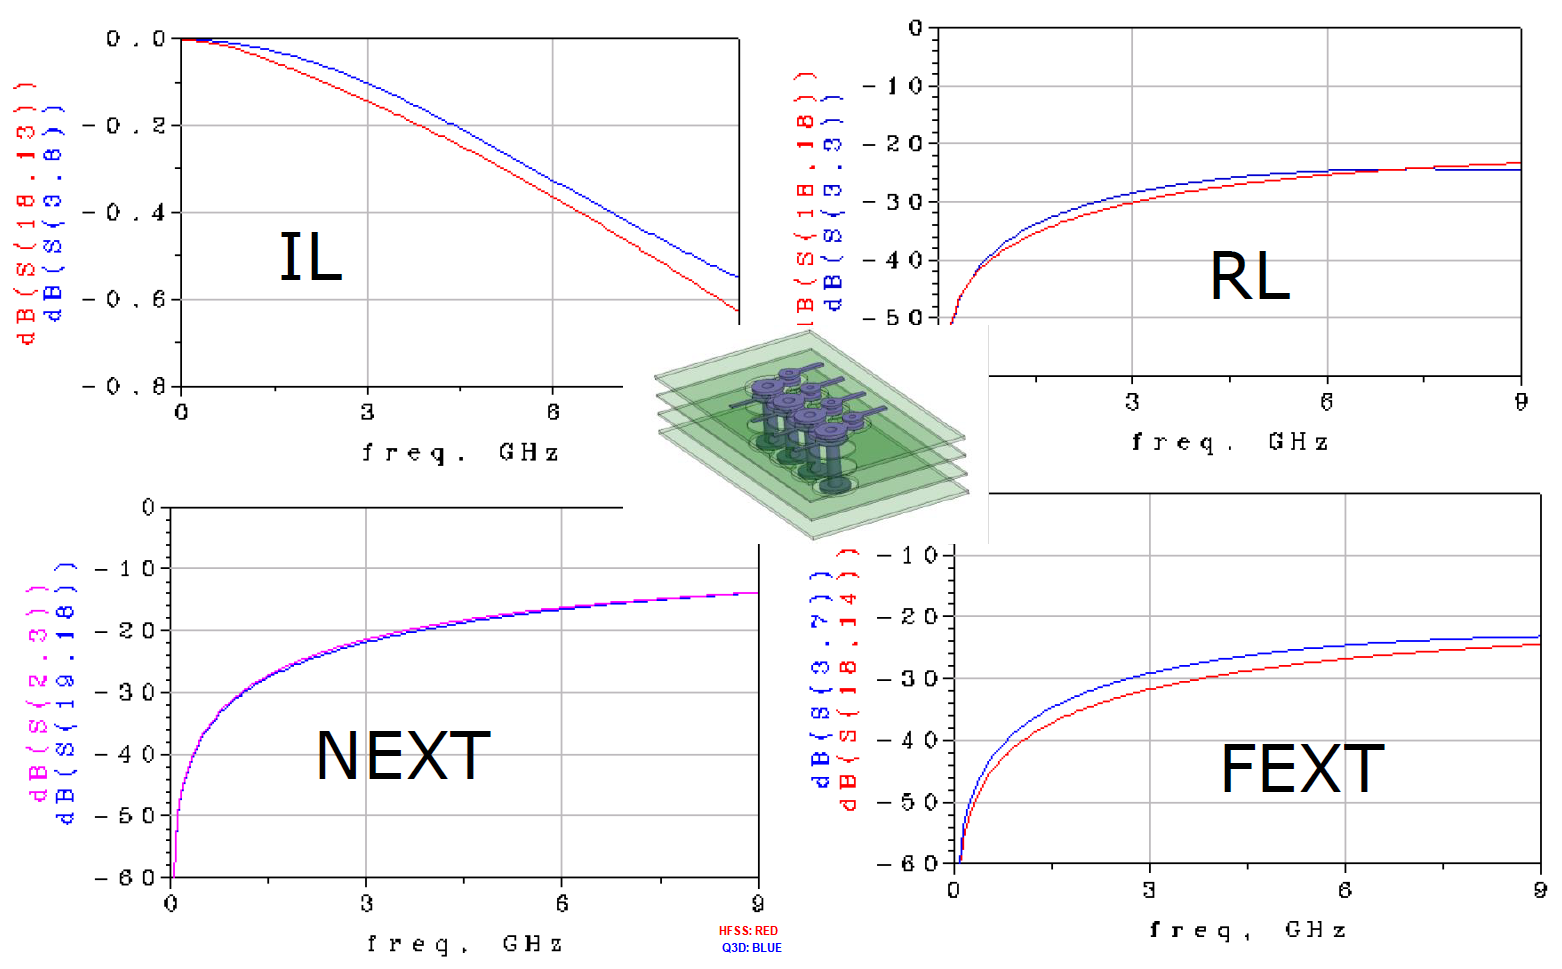
While this method is still useful, the judgement of model’s quality very much depends on one’s experience or tolerance and thus is not very objective. As the data rate becomes higher and interconnect becomes more “coupled” or lossy, new parameters are defined to check a S-parameter’s figure of merits.

Here we list some of important and non interface specific S-parameter checking parameters for reader’s reference. Many of these quality metrics have been incorporated into our SPISPro module for an one stop shop of all the S-param. processing needs.

S-param. check introduced in IEEE 802.3 bj: This spec. defines a “figure of merit” for each interconnect used in a high-speed SERDES (>= 100G) channel. Generic package and motherboard portion are included using behavior models and cascaded with user provided through-type/NEXT/FEXT S-parameter to form a complete and consolidated channel. Then parameters of FFE at the Tx and CTLE+DFE at the Rx are swept to see how good a channel can perform in the best scenarios . A calculated “COM” (channel operating margin” value is then calculated to represent this channel’s potential. COM’s value is significantly affected by cascaded S-param’s parameters listed below:

  • ILFit: Insertion loss fit

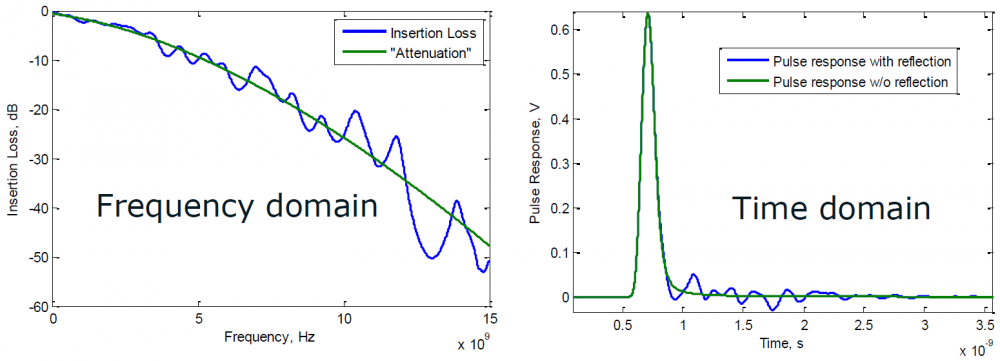
The inductive and capacitive properties of a channel will introduce frequency dependent loss. To avoid signal distortion, it is usually desired to have a linear relationship between frequency and the channel losses such as well-behaved example below:

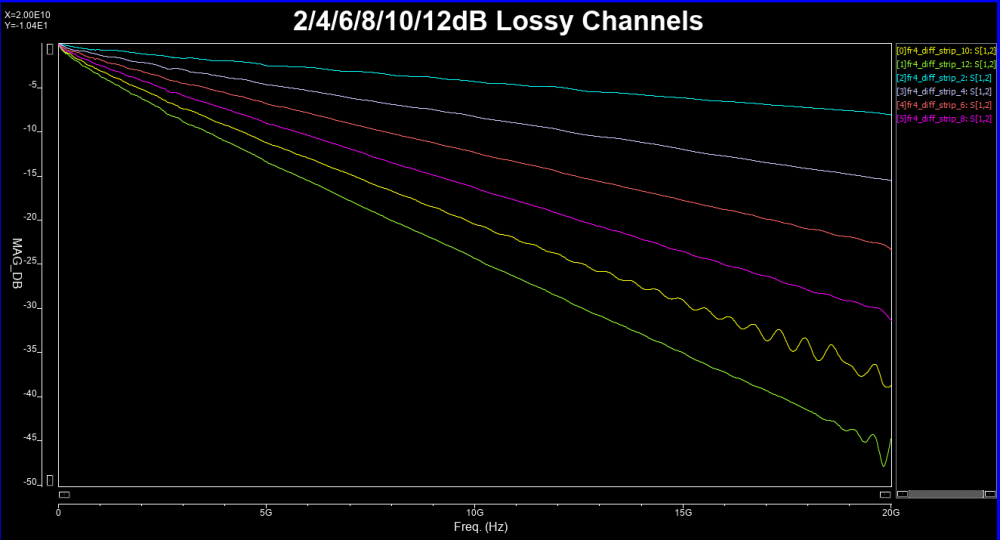
However, due to impedance mismatch and multiple reflections, such linear dependency may not be possible. Thus “ripples” may exist which in terms introduce the time domain noise and causes degraded final eye height/width. A “fitted-curve” (ILFit, up to half of bandwidth, i.e. Nyquist rate) may be introduced to approximate such insertion loss. Such smoothed curve can be viewed as channel without mutli-reflection and is thus a “best-case” scenario.

ILfit is usually calculated in a minimized-squared-error (MSE) sense. Pre-defined curve’s order is used and its weighted parameters are then fitted.

  • ILD: Insertion loss deviation

Once an ILfit is calculated, one can calculate the “difference” between Ithis fitted curve and original data to form the ILD:

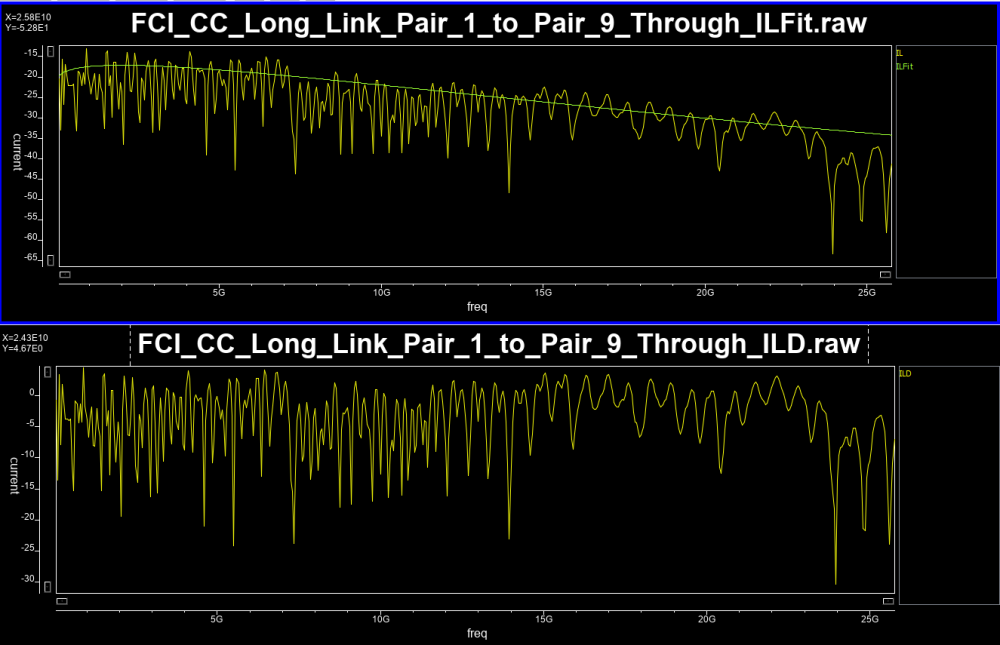
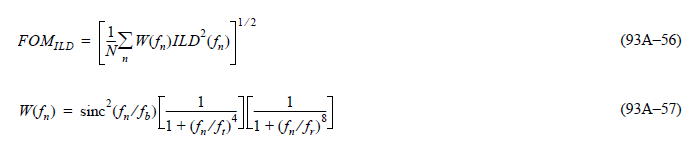
The calculated ILD values can then be further integrated to form a channel’s Figure of merits”:

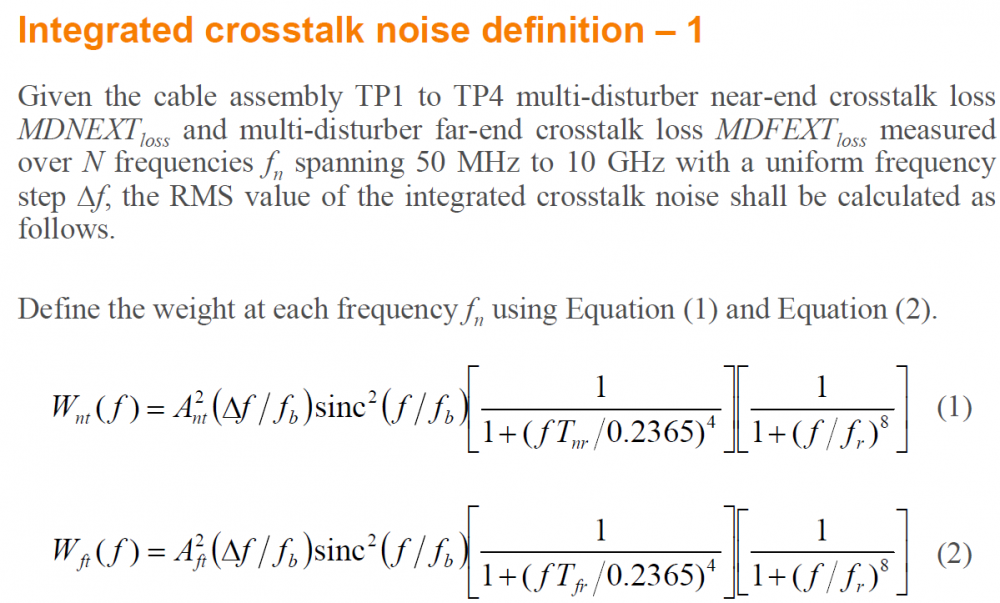
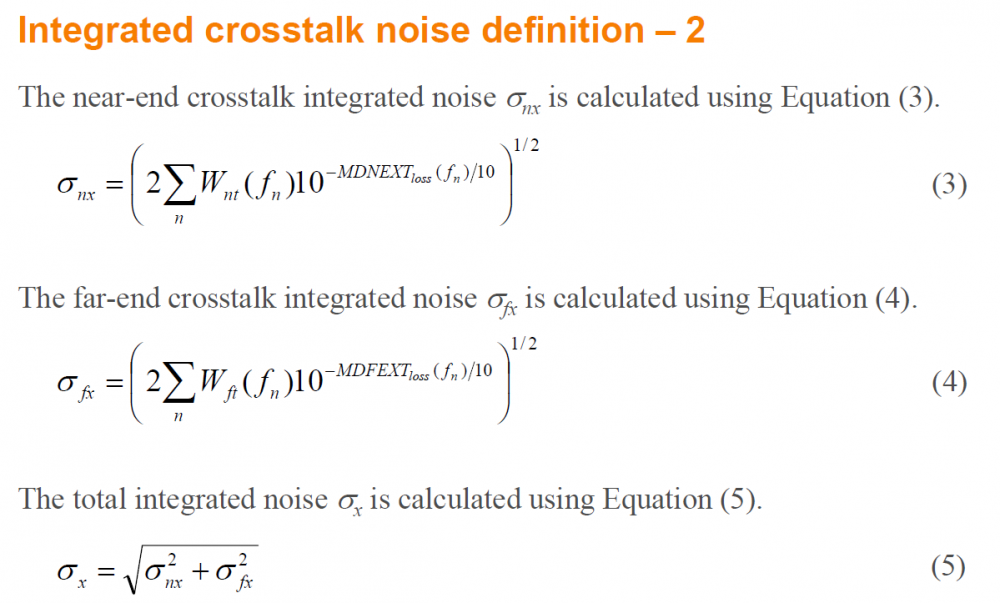
  • ICN/ICF: Integrated NE/FE cross-talk noise

These are calculated RMS values integrated (summed) over a frequency range. The integrated value represents impact due to both near-end and far-end crosstalk:

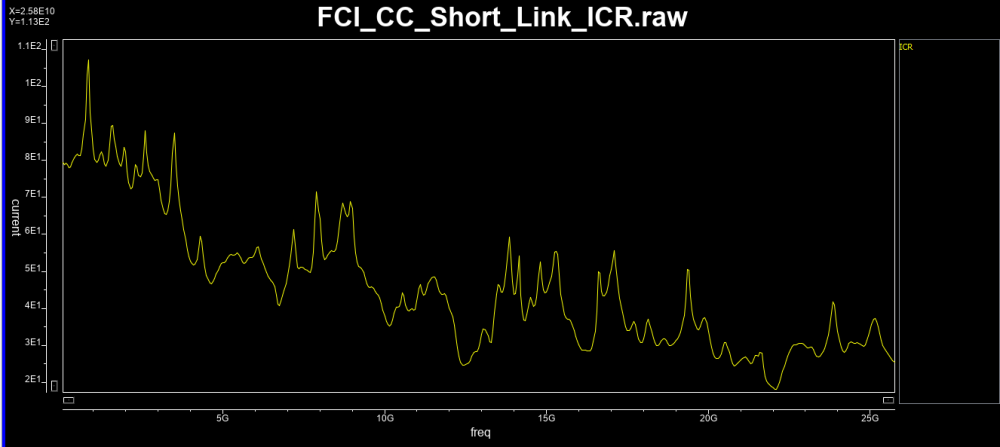
  • ICR: Insertion loss to cross-talk ratio

This value compares channel performance’s impact due to insertion loss vs cross-talk.

  • COM: Channel operating margin

The amplitude resulting from single-bit-response (SBR) can be separated based on the signal and losses due to crosstalk, insertion loss etc. With equalization at both Tx and Rx side both being taken into account, the best case value will eventually be summarized as an indicator, “COM” for the channel performance’s comparison.

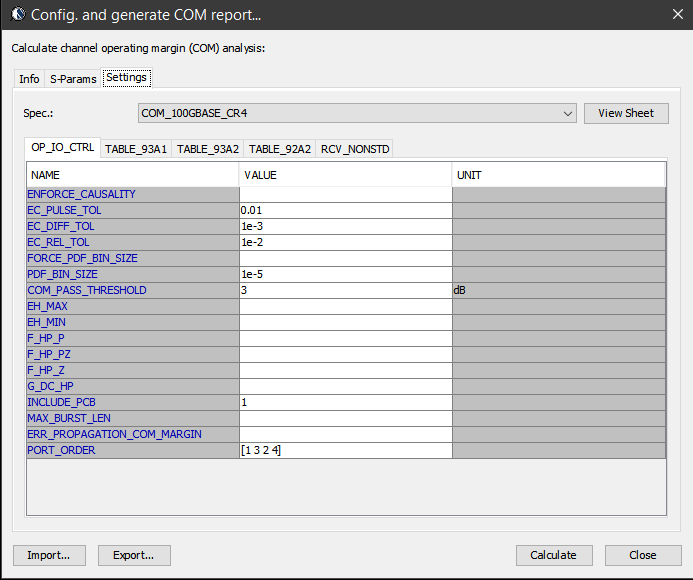
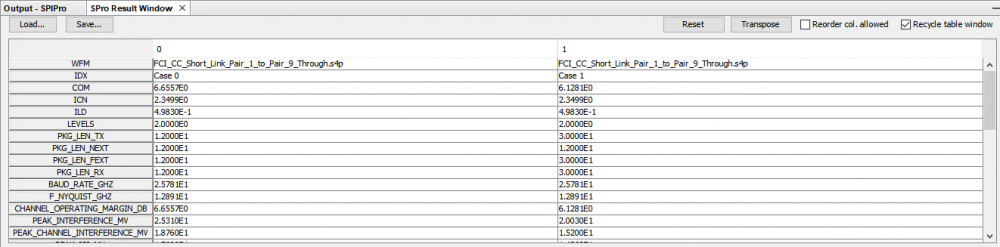
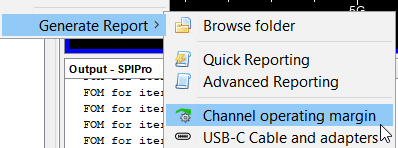
S-param check and parameters defined in COM methodologies has profound impact. It not only sets an example for other interfaces (e.g. USB-C, discussed below) to check their interconnect model, but also provides a meaningful correlation between different S-param’s deviation toward its final eye impact. Details about these calculation can be found in 802.3bj spec.. SPISim’s SPro integrated COM as part of the S-param reporting flow as shown in various plots above and screen shots below:


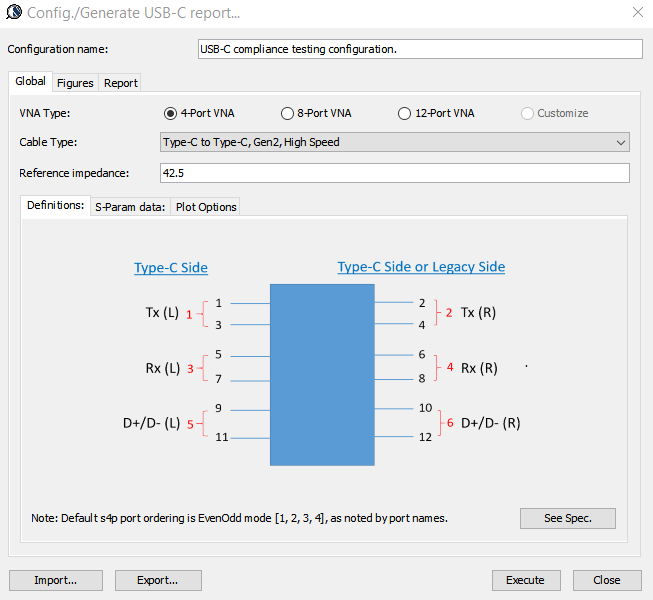
S-param. check introduced in USB-C Cable/Connector:

USB Type C (USB 3.1) spec. was published in 2014. Not only does it increase the signaling speed from previous gen. to be 10Gbps, it also provides power charging capability, has a smaller connector form factor and has non-directional connectivity. As this spec. is back-ward compatible, both legacy and low-speed USB connectivity are also supported. As such, there are many different scenarios, coupled with different VNA capabilities to be considered:

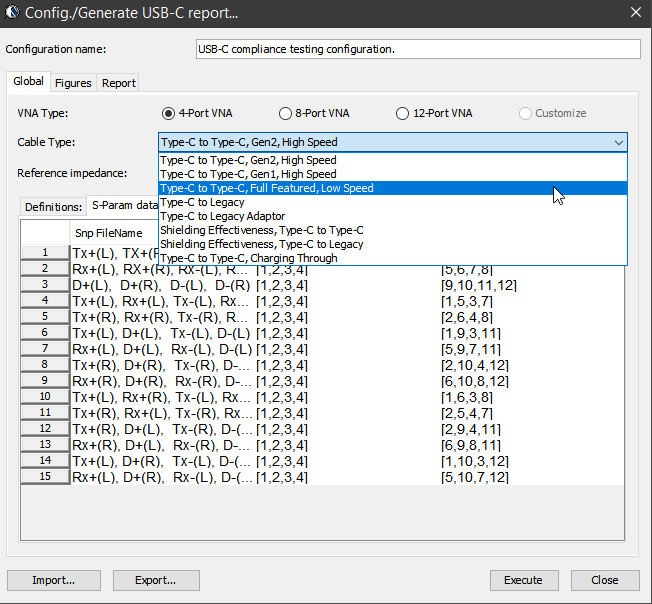
However, the main check (ILD/IMR etc) in USB-C is more or less similar to those used in COM methodology. Nevertheless, there are still minor difference in terms of implementation such as how insertion loss should be fitted and weighted…. as discussed below. In addition, since there are different pairs of traces (e.g. SS, D+/D- etc) in the cable/connector, dedicated checks between signals are also included. Essentially they are calculation applied toward specific S-parameter matrix elements corresponding to the incidental/reflective behaviors between those traces/ports.

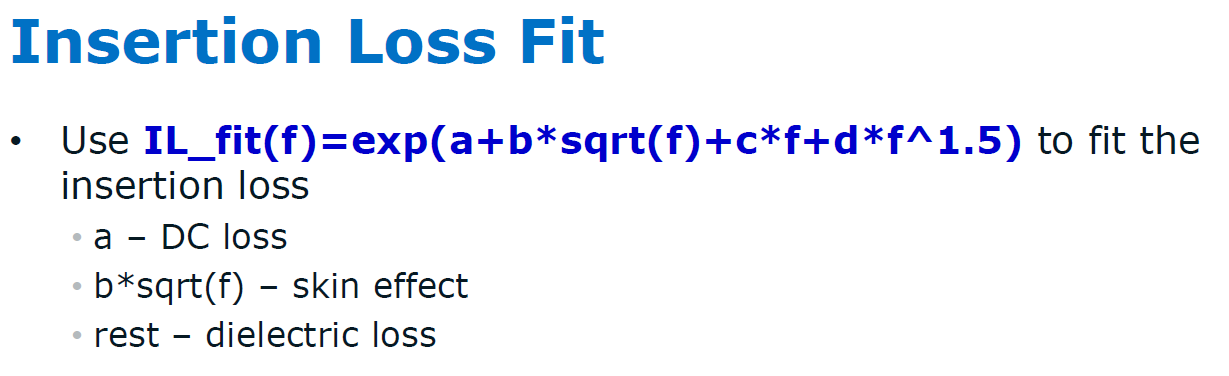
  • ILfitNq: Insertion loss fit at Nyquist rate

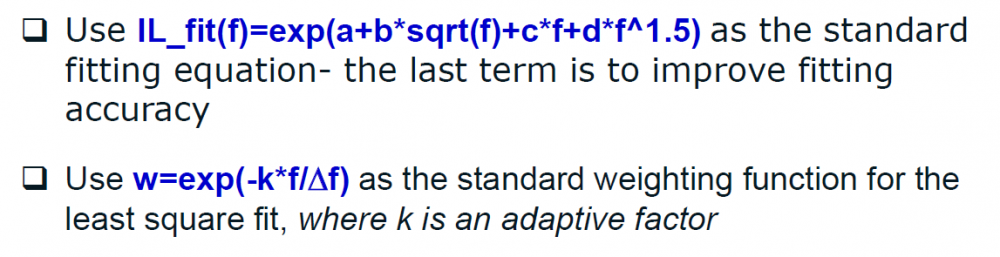
COM methodology in 802.3bj spec. spells out what the fitting formula should be used. However, this is not the case for USB-C. In a reference materials for the USB-C dev. forum’s tool, Interpar, it suggests a different formula as shown below should be used:

In addition, a “weighting” function is suggested to downplay the deviation at the high-frequency portion:

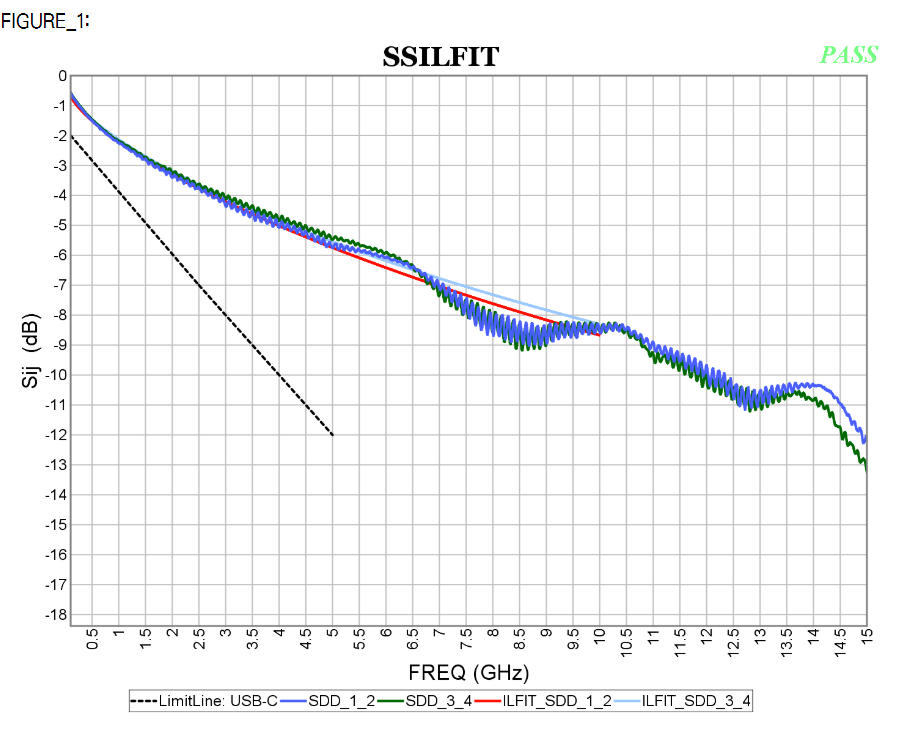
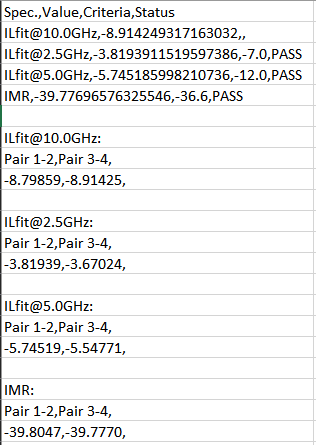
The checking of the IL_Fit/ILD relies more on frequency dependent spec. lines as well up to the Nyquist rate. A “Pass”/”Fail” indicator is then calculated against these spec. line.

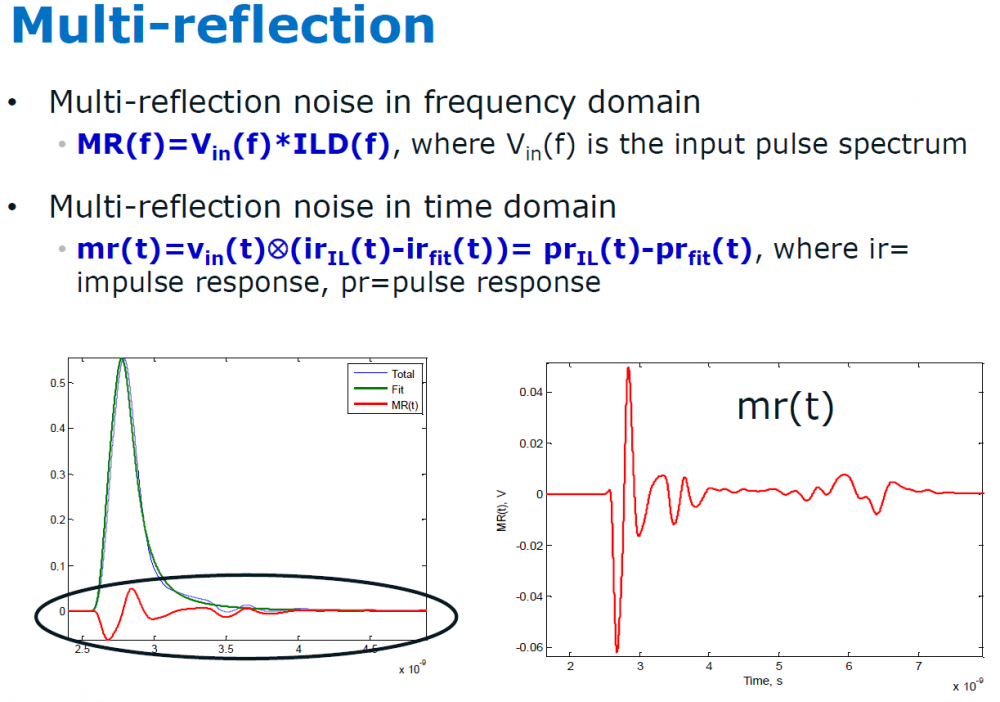
  • IMR: Integrated multi-reflection

The deviation part (ILD) has been separated to form its own figure of merit using formula shown below:

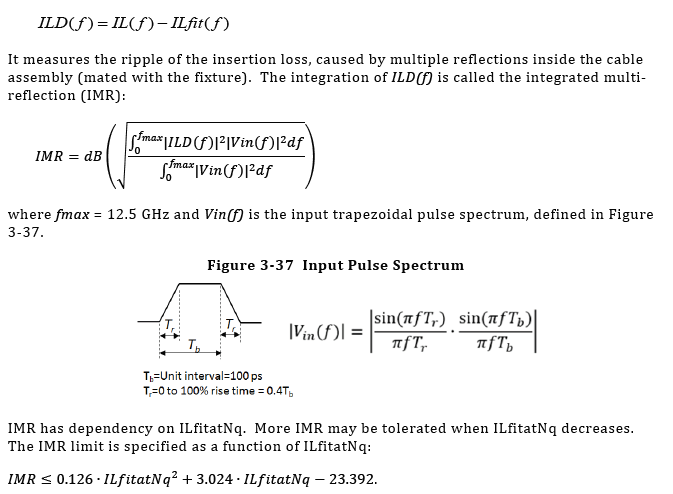
Resulting IMR values are super-speed pair (SS) specific:

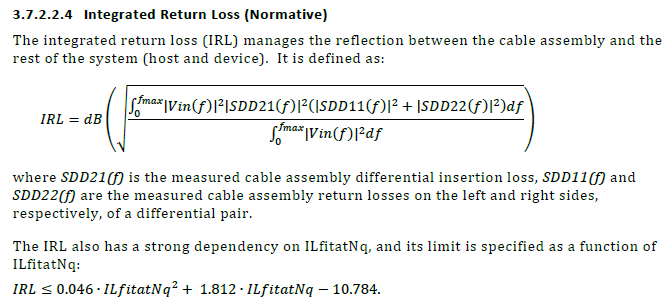
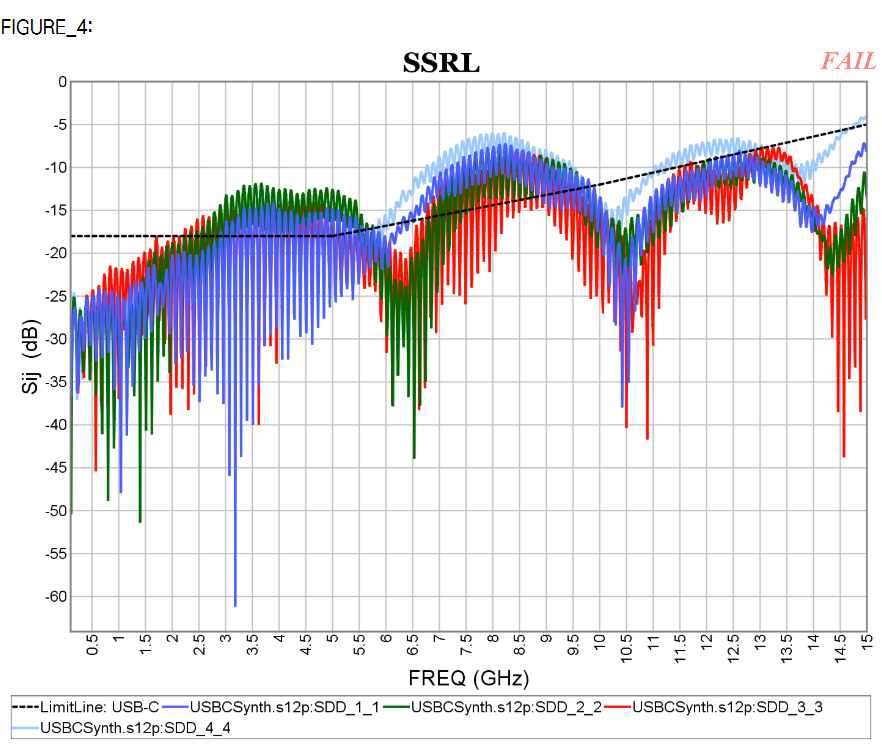
  • IRL: Integrated return loss

This is a metric dedicated for return loss check:

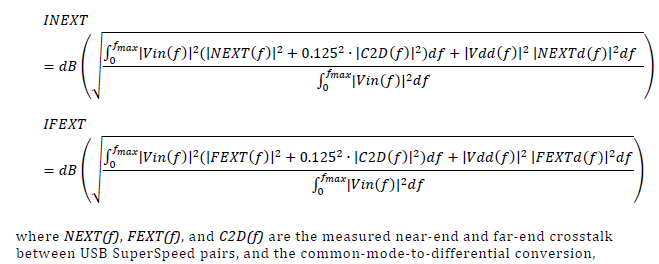
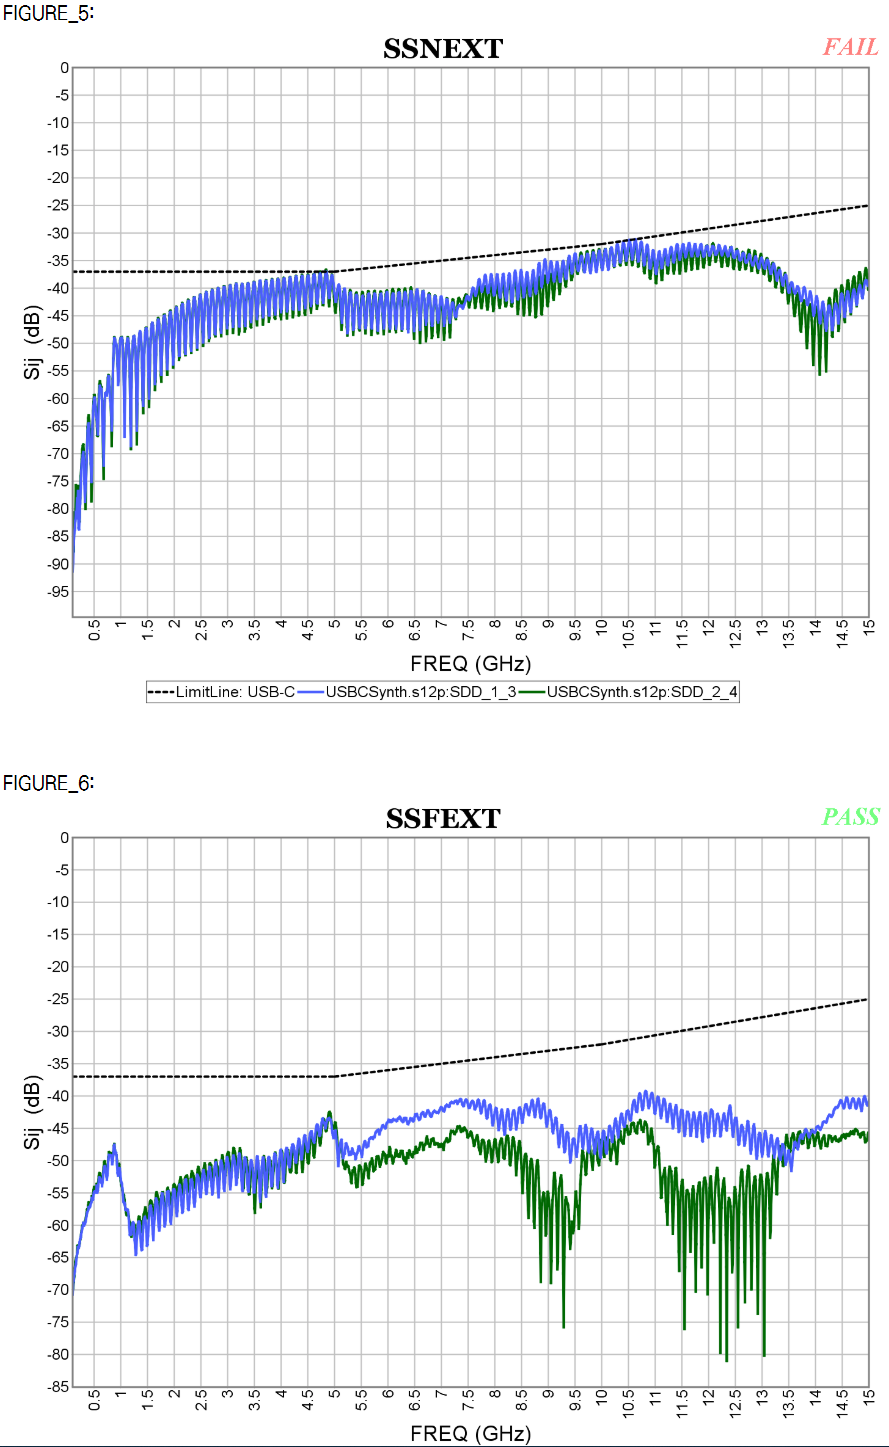
  • INEXT/IFEXT: Integrated NEXT/FEXT noise

Similarly, there are metric dedicated for cross talk check and spec-lines:

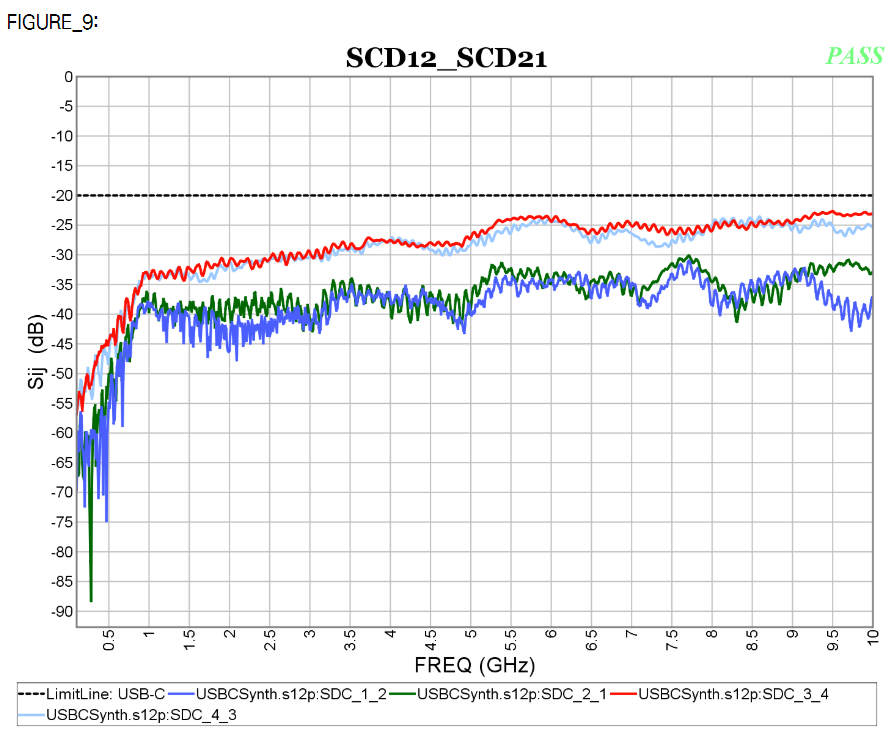
  • Others: other signal specific check can be performed by simply configuring and plotting specific matrix elements within certain frequencies ranges then compare with defined spec. lines. Example of differential-to-common mode conversion is shown below.

  Both COM and USB-C S-param methodologies are parts of our SPro’s reporting flow:

S-param check introduced in IEEE P370:

IEEE P370 committee’s objective is to define fixture design as well as data quality metric standard for high speed interconnects. A good overview article is available at the signal integrity journal linked [HERE] The P370 WG3, which us SPISim took part in, focuses on S-parameter’s various quality metric (QM):

  • PQM: S/Y-Passivity quality metric
  • RQM: Reciprocal/symmetry quality metric
  • CQM: Causality quality metric
  • EQM: Even-Odd quality metric

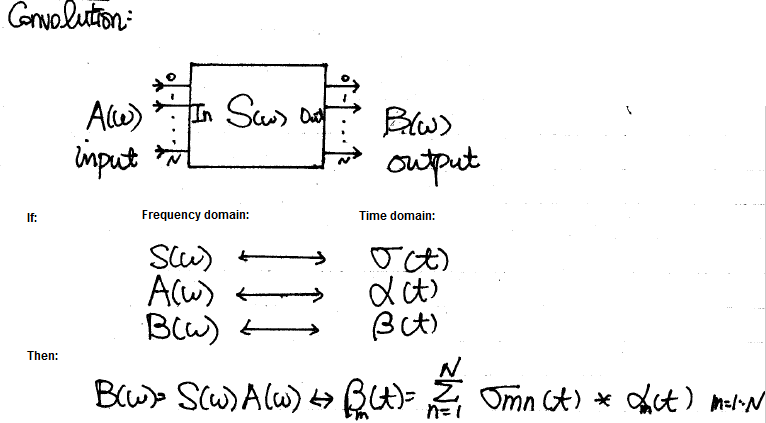
Previously, we have written a post [LINKED HERE] detailing how these metrics are calculated. Interested readers may also wait for upcoming P370 spec. for the details. One thing to note is that regardless it’s COM, USB-C or channel simulation like those involved IBIS-AMI models, high-quality interconnect/S-param model is usually required as it will significantly impact the resulting impulse response or pulse/single-bit response. When convolving these time-domain responses many times to obtain final PDF/CDR for BER, any initial imperfection in the S-param model will be “amplified” and cause end results’ error. As such, in both COM and USB-C’s flow, the cascaded or user measured S-param have always been checked and adjusted particularly in the aspects of passivity and causality. They are done particularly at the low (toward DC) and high frequency (trailing tails) region. Separated procedures have been applied to extrapolate for a DC point by using first several data points then fit with “theoretical” good behavior model equation to make sure DC response is correct. These details are not even mentioned in the 802.3/USB-C spec…. one must bite the bullet and study to their reference implementation (e.g. matlab scripts) to find such procedure’s existence. Without this auto fixing, calculated COM/Spec. parameters will not match those produced by reference script or InterPar forum tool.

A channel analysis trilogy

Preface:

We SPISim recently developed and released free web apps for various channel analysis tasks [Click HERE for overview]. While their product page each gives good descriptions and demo about what each tool can do individually, we think it will also be beneficial to put them all together in one flow so that user may have better picture about our ideas behind these developments. Thus this post is written for dual purposes: First we would like to explain how a channel analysis is usually performed. Secondly we want to show how one can perform such process using apps even directly from the web browser. Just for comparison, creating AMI models and license for this type of simulator usually costs tens of thousands of dollars up front. Now it can be done for free!

The big picture:

[Fig. 1, A SERDES system]

Let’s use a SERDES system, shown in Fig. 1 above, as an example. For other interface’s such as DDR, please see our previous blog post for considerations about similar application.

A SERDES system uses a point-to-point topology. In Fig. 1, the middle block enclosed in blue represents the channel. It mainly contains passive interconnect such as package, transmission line, vias, connectors or even cable. However, the channel may also include active components such as Tx and Rx devices. These active components are usually represented by IBIS or spice models. Alternatively, we can pull these active components out from the channel and “merge” them into the EQ as “analog front end” stages. In that case, the channel become pure passive. One of the reasons why one may want to do it this way may be either that the IBIS models are not be ready, or there are no simulators available to have them included as part of the simulation. This is usually the case when a free spice simulator is used as none of them that I am aware of supports IBIS out of the box. In general, unless analog front end AMI models and a pure passive channel, represented as a S-parameter, are used together for the analysis, the active devices do need to be part of the channel characterization in order to obtain accurate time domain response.

The next step is to obtain or generate AMI models for each Tx and Rx EQ circuits. Interested reader may refer to several posts we have written about possible software architecture and methodologies.

Regarding the channel analysis process, a simulator will first convert the characterized channel in s-param, or step response into impulse response first, then depending on the simulation mode being specified, this response or convoluted bit sequence will be fed into Tx and Rx respectively to obtain the overall response. For LTI system, a permutation process will be performed for all possible bit combinations to calculate the PDF of each sampling point statistically, then integrate to obtain the CDF and thus create a bath tub plot. For  a NLTV system, bit-by-bit waveform is accumulated and overlapped to plot the eye and BER may be extrapolated from there. While not mentioned here and also not yet implemented, various jitter and noise components are also important when creating the stimulus or calculating final results.

Following the analysis procedure detailed on Section 10.2 of IBIS spec, to summarize them briefly, a channel analysis includes three tasks: channel characterization, EQ model creation and putting them all together for channel simulation.

Task 1. Channel Characterization:

The first step of channel analysis is to characterize the channel, the blue block of Fig. 1, in order to obtain is time domain response. Even with active Tx/Rx front end being involved, the assumption here is that the characterized response will be linear time invariant (LTI). With a LTI input, a channel simulator can either perform statistical analysis if other EQ components are also LTI, or it can have the impulse convolved with PRBS bit sequence to generate full time domain waveform, finally procees to process with NLTV EQ components to get the final time domain waveform for further eye analysis.

If the passive channel is from post-layout, then user will need to use other 3D extraction tool to obtain the interconnect’s s-parameter. Devil’s details here will then include making sure the S-parameter is in good qualities such as being passive, causal, symmetric and asympotic etc. Also depending on the simulator, converting the single ended s-parameter to mixed-mode/differential one may also be needed. On the other hand, for pre-layout case, user will then first obtain or generate each component’s simulation model. Assuming what user have here are Tx and Rx IBIS model, transmission line and other R/L/C based behavioral models for package, via and connectors, then first one can use our [SPISim_IBIS web app] to convert those IBIS model into free simulator compatible spice subcircuits:

Then head over to LTSpice, offered by Analog device, to download and install the free simulator.

Either create schematic or a text netlist of the channel them perform a transient simulation to get its step response. The output will be a raw file in compressed format which can be viewed either in place in LTSpice or use SPISim’s free SPILite:


Task 2. Tx/Rx EQ Modeling:

If no EQ circuit is involved, then user can simply tinker the circuit/simulation settings completed in task 1 to perform conventional time domain based SI analysis. The reason stat-eye like channel analysis comes to play is because EQ circuits (represented in green block for Tx EQ and orange block for Rx EQ in Fig. 1) are involved to open the eyes and many more bits need to be “simulated” to obtain/extrapolate low BER, thus can’t be done easily using nodal based spice simulator as it will simply take too much time. EQ circuits can come in different models such as behavioral, spice or AMI, with AMI being the common denominator supported by almost all channel analysis tools from different vendors. Thus in the second task, we need to generate IBIS-AMI models for Tx and Rx EQ.

IBIS-AMI modeling usually involves C/C++ coding or compilation into .dll/.so if starting from scratch. However, user may use [SPISim_AMI web app] to generate AMI models instantly without going through those steps:

Test driving the model and view its response in place to verify the model’s parameters meet the performance needs:

Then click “Generate” button and the AMI model will be generated instantly. If cross platform models are desired, use [SPILite] instead and all Windows 64, Windows 32 and Linux 64 models will be generated in one shot.

At the beginning of this section, we mentioned that the EQ model can also be in the form of spice circuit, whether encrypted or not. In that case, its detailed behaviors will not be able to be described exactly by template based  or pre-defined models. However, a spice wrapper AMI model supported by SPILite can still be used, it will make this spice model “AMI compatible” and can be used in other channel simulators. User’s licensed/installed simulator will be called during the channel simulator.


Task 3. Channel analysis:

With both Tx/Rx EQ models plus channel response being ready, we can then perform the StatEye based channel analysis using [SPISim_Link web app]:

Detailed usage about this tool is demonstrated in a video on its product page. Basically, user can specify the generated AMI models in the “Tx EQ” and “Rx EQ” tab respectively, then do the same for the step response waveform to the “channel tab”. Both “statistical” mode and “Bit-by-bit” modes are supported here, yet if NLTV EQ such as DFE is used in part of the receiver, then “statistical” model can not be performed. With these set-up ready, a “Simulate” click will show the results in place within seconds:

The bath tub curve representing the CDF is also ready for inspection/eye measurement:

Alternatively, task 1 and 2 are also directly supported in the SPISim_LINK function alone so user may choose to experiment with different settings and see their response first before generating corresponding AMI model. For example, a simple change of post-tap value in Tx can be done in the UI:

Then the re-simulation will quickly show its effect in resulting eye:

For a system developer, he/she may obtain corresponding AMI models from their IC vendors and follow the same process to give these model a try. For an IC vendor, the AMI model generated here will also be compatible with other vendor’s tool and you may provide these models to your system clients before committing to perpetual version of the model.

Here you have it…. an economic yet efficient channel analysis which can be done directly through the web has been enabled for your design needs without any cost!

IBIS-AMI: An economical yet efficient modeling flow

Preface:

It has been often believed that IBIS-AMI modeling imposes a comparably high cost and technical barriers to get started. An AMI modeling engineer certainly has the due diligence to be familiar and understand the basic of link analysis or AMI flow. However, the requirements of implementing the models in C/C++ codes, compiling them into .dll/.so libraries, and being able to run on third party (often expensive) EDA tools with consistent results are often too much to ask for… or at least will increase the design cycle. To meet these challenges, several big EDA companies have provided top-down based flow for AMI generation directly from architecture codes. In exchange with the “click-button” convenience, SERDES needs to be designed in its environment first and tool’s up-front expense also needs to be considered. Further more, the long term cost of the generated AMI models (in terms of model support, maintenance and extensibility) are often ignored. It’s also true that even with these top-down flows, compilation on different platforms (win32, win64, linux) etc are still inevitable.

We published several free tools recently and presented a paper at the recent IBIS summit regarding AMI modeling. Together with other open source/free link analysis tool to be mentioned at the end of this post, we think it’s now a good time to consider an alternative AMI modeling flow. This proposed methodology in this post will be economic (no front end tools cost) and efficient (give SERDES/AMI developer most control).

[Note that in this post, we use link tool/simulator alternatively to represent the application loading IBIS-AMI models and calling their functions.]

Concepts:

Engineers familiar with Spice-like simulator know that we usually only need one platform specific simulator (binary). Schematics netlist is in plain text format and can be used cross different platforms (assuming good practice such as relative modeling path, file line endings are followed). A general purpose spice simulator is not design specific so there is no need to have different simulators for different circuit or IC design. This compatibility is achieved by building on simple rules, i,e KCL and KVL and linear algebra. This way a simulator can decoupled from the implementation details of design specifics.

In the “AMI-modeling” world, are there such simple rules to be found so that we don’t need to compile a binary just because the design is different? Understood that there are always trade-offs: e.g. simulation speed of design specific binary model vs slower yet convenience during modeling cycle, then at least we should find a way so that modeling engineers can focus more on the basic of the algorithmic blocks and hopefully, still find a way in a later stage to generate a speedy model with minimum extra tasks (C/C++,dll etc)

AMI model, at its current scopes, is mainly for SERDES application. They are mostly point-to-point system or can be processed stage by stage. We may also think it this way by looking at the defined AMI-API function prototypes:

AMI_Init and AMI_GetWave are two main processing routines defined in the API spec. Various arguments are passed-in and the AMI models are responsible to perform designed algorithmic within the model then return these values in place. By “in place”, we mean the impulse_matrix’s and wave’s content will be modified in the same memory address before returning back to the calling application… which is mostly simulation platform or circuit simulator.

Based on these observations, we can liberate the couplings between 1) link tool and models, and 2) models and underline algorithmic processing. Via these decoupling, an economic yet efficient flow can be made possible.

Decoupling within the model:

First, we want to observe how data are being passed from the link tool to the model. In the schematic above, the input to the Tx stage is either channel’s response (LTI mode) or bit pattern (NLTV). If the Tx is a simple pass through, then Rx will receive similar information without being affected by Tx:

Take AMI_Init as an example, we can achieve this decoupling using SPISim’s free SPISimProxy model. SPISimProxy will write the argument received from the link tool to a plain text file. After the AMI model’s processing, it will again write out the processed data to another text file before finally giving back to the link tool. This way data being exchanged between link tool and the model are now exposed… even if they both are compiled binaries. The two blue boxes above represent such generated text data. The main function of the AMI_Int function, purple block in the middle and existed in the model’s .dll/.so file as a form of the C function, is to transform input to output response.

With this, we can now replace the AMI_Init function with our own… we can write this function in matlab, python, perl, java etc language instead of more demanding C/C++ form. It only needs to interface with two text files just exposed with the following operation sequence:

  1. SPISimProxy will expose the calling arguments into a text file, the top blue box
  2. User’s script will read the text file and perform necessary processing
  3. User’s script will write out the data in similar text format
  4. SPISimProxy will read the generated text data, form argument and pass back to simulator.

Because each of these steps can be customized by Proxy’s .ami settings, a configuration file or even environment variables, AMI developers are now liberated to use what ever languages they preferred without dealing any C/C++ if they like. There is also no need for .dll/.so compilation as SPISimProxy has been pre-compiled to support most of the platforms.

The example above uses AMI_Init as an example, other API calls, such as AMI_GetWave or AMI_Resolve can be done in similar fashion. Clean-up calls such as AMI_Close or AMI_Resolve_Close are also supported in SPISimProxy model so if needed, AMI modeler can also clean-up all these file traces at the end.

Part of the arguments passed from the simulator is the model pointer. This model pointer (void*) is supposed to be persistent during the AMI process. The script author may use file based persistence mechanism across AMI_Init/AMI_GetWave calls to store constructed data structure or settings etc. By avoiding using C/C++ specific pointers or data structures, the process becomes neutral and can support many different languages.

Decoupling with the EDA tool:

The aforementioned process requires an application to drive the proxy model, and thus the modeling scripts. This can be achieved with our free SPISimAMI.exe. It’s again pre-compiled to support most platforms. Its built-in pulse response enable user to model LTI based AMI process directly. For bit-by-bit based input data, user may use our SPILite or other free simulator such as our SSolver or NGSpice to generate bit sequence, then feed this input in .csv format to the application. SPISimAMI will then take this user’s input, form the proper arguments and send to underlying AMI models… it can be modeling script current under development, or an existing IBIS-AMI models for testing or validation purpose. SPISImAMI can also be used to drive an existing AMI models via SPISimProxy so that user may get insights about this process. In the demo video we posted on SPISimProxy page, a matlab script has been used to demonstrate the AMI_Init process.

Test drive with open-source link tool:

Once the given response work properly with the prototype implemented in modeling scripts, next step is to run them in a link tool for BER like analysis. For this purpose, pyBert may be used as it also load IBIS-AMI models, including our SPISimProxy.

Up to this point, there is no front-end cost involved in the AMI modeling process and a developer only needs to use his/her own favorite language to deal with plain-text input/output. In addition, the debugging and testing of the model prototype can be done with direct command call instead of multi-step GUI operation/invocation. This not only avoid license needed with 3rd party tool, but also ensures an efficient work flow with easily repeated consistent results.

Optimization and model release:

There are several possibilities to release the models from on this process:

  • The model publisher may encrypt the script if needed, then distribute as they are. This will produce most accurate results as they have been validated by the author during the modeling process. The disadvantages include that: 1) it’s less efficient as the data exchanged between the SPISimProxy and the modeling scripts are file based, 2) the model recipient may need to install other run time interpreters such as perl, python etc in order to run the encrypt/compiled script, and 3) the client also needs to download the SPISimProxy from our site as unlicensed redistribution is strickly prohibited.
  • We can work with the model publisher to provide specific API to the prototype model such that the IP and accuracy are still maintained, yet the performance will be improved dramatically. We can also remove the unlicensed terms and add the proxy class to have your company’s name so that you can distribute SPISimProxy together with your model.
  • We can also create the corresponding AMI model with pure C/C++ codes to that there is only one model to be released with best performance and convenience for the clients.

The modeling flow suggested above is not proprietary and can also be implemented within the corporation or the modeling team. We believe that with the liberation of the modeling engineers from these unrelated AMI modeling process, they will be able to focus more on the core business logic, i.e. the algorithmic part and deliver the best quality model for the industry’s progress. Those non directly related tasks can be left for other EDA professionals (* cough *) if needed.

Simulator development: Modeling (S & P)

System channel is usually represented in S-parameters. They can be extracted in frequency domain using a 3D field solver, and/or cascaded stage by stage using tool like SPISim’s SPro. With LTI (linear time invariant) assumption, it’s possible to synthesize eye or BER plot of millions of bits using statistically analysis… using single time domain pulse for these parameters. However, it’s still often desired to be able to simulate the s-parameter in time domain for defined bit patterns. Thus, a system simulator like our SSolve must be able to support such requirement. In addition, one may also want to know the frequency response when given a broadband spice converted spice elements, such as via, package or connector models. So the reversed process, i.e. extract S-parameters from spice elements, is also often required. In this post, we will briefly talk about how these may be developed in simulator like SSolver.

S-Element… S-Parameters:

There have been many conference and journal papers proposing different methods of simulating S-parameter in time domain. However, at the most basic level, S-parameter can be considered as a transfer function or filter block. Thus DSP techniques can apply: transfer function multiplying inputs in frequency domain can be converted into time domain using convolution:

Convolusion

The time domain at the right hand side can be further separated into two parts: history up to this time point (integrate from -infinity to t=n-1) and the value at this particular moment t=n due to input. The first part is a constant as it’s already happened in the past and can’t be changed, the second part is, however, input dependent and must be updated within the “solve” and “stamp” hot loop inside newton iteration. When putting together, they form a Norton circuit form of I = Y * V + J where Y is value affected at this moment and J, a constant, is due to past history. This Norton form can then be “stamped” accordingly for matrix solving.

Interested reader may refer to the paper published by HP linked below for detailed explanations and math:

Integration of Transient S-Parameter Simulation into HSpice

The equation [18] and [19] is the aforementioned Norton equivalent circuit form and can be used accordingly.

The convolution method needs to update history with the solved results of this time step for next time step to be used. In addition, the basic convolution requires that the dt to be constant, thus a variable time step simulation will be greatly hampered by this requirement in terms of performance. So the convolution modeling has rooms for improvement.

One of the possible approach is using vector fitting technique mentioned in previous post about “W-element” modeling. With the S-parameter data in frequency domain, one may construct a Pade approximation using several poles and zeros. Then basis functions can be created for each of the pole in time domain and simulate accordingly. A benefit of this process is that the constructed form is a rational function which is guaranteed to be causal. So if there are issue regarding causality of the provided s-parameter, it can be fixed during the modeling process. Lastly, due to exact fitting of multi-port s-parameter across the frequency spectrum are not likely, some sort of error minimization (in the MSE sense) is needed to have a balance between accuracy and number of poles.


P-Element… Port element:

Often times after a package, connector or via modeling engineer created a model, he or she will use tool like broadband spice to convert such 3D extracted s-parameters to spice equivalent circuit composed of various basic elements. When a system designer or SI engineer receive such converted models, the original S-parameter may not be available already. Rather than insert this model into the channel and simulate blindly, it’s often beneficial to be able to reconstruct and inspect the model’s frequency domain response first before actually using them. S-Parameter extraction via simulation is basically a form of AC simulation, thus with AC model of the system elements constructed, the S-Parameter extraction part becomes easy.

The context here is small signal S-parameter extraction, thus all the AC signal is done very close to the operating point. That is, a DC solution needs to be obtained first for each port’s respecitve bias condition, then the AC stimulus is applied and solve for each frequency point.

A “Port” or “P-element” has several properties: dc bias condition, reference impedance, port-name and port-order. For a multi-port s-parameter extraction, one port is excited at a time with specified dc bias value. AC sweep is then performed while the other ports are terminated to their reference impedance. The power wave of input and output, measured and processed using current injection and nodal voltage measured, can then obtained for this input to the other output ports. Using simple math described in the link below:

S-parameter measurements

one can obtain S-parameter of Sij (i is port with input stimulus, j are the other ports) content easily this way. Repeat the same process for the other ports one at a time (with their respective dc bias condition) and the full S-parameter can be obtained. Finally, the order of ports are arranged according to the port properties, their respective port name are written out at the top of the touch stone file and the process is complete. Should there be needs to convert to other formats such as Y, Z parameter (sometimes good for checking connectivity), one can do so easily with formula (assuming generalized 2-N ports) or simply use developed tool like our SPro.


Back to the top:

Back from these modeling physics to the computer science domain, one also need to consider the following topics when doing simulator development:

  • Memory pool management (allocation, expansion and clean-up)
  • Multi-threading consideration
  • Plug-in architecture for future devices
  • ….

While the list can go on and on and the tasks may be daunting, the end results are definitely worthy to the analysis flow and methodologies development. With developed simulator, there is no longer absolute need to form a close-loop formula or equation in order to solve circuit equation. The module or flow running on top can simply create netlist and have this simulator solved for you. Not to mentioned this also make maintenance and testing much easier. For an EDA company like us, I would say this is a journey worth taking.

Simulator development: Modeling (B & W)

When modeling device for a circuit simulator, the raw netlist input needs to be converted into internal structure first, then a physical model is constructed during the “modeling” phase, and corresponding equivalent Norton or Thevenin circuits’ parameter are solved within each Newton iteration at each timestep. The solved parameters are finally “stamped”  into system matrix for Newton iteration solving. “Model” and “Solve” is the essential part of device modeling for a circuit simulator and that’s whey “Physics” come into play.

In these two posts, we will briefly talk about how system devices, in particular IBIS, Transmission line and S-parameter are “modeled” and “solved”.

B-Element… IBIS:

Looking at the IBIS’s structure, the modeling part is actually quite straight forward:

IBISEvolve

The four IV curve data: pull-up, pull-down, power clamp and ground clamp act like non-linear resistors. With terminal voltage known within each Newton iteration, the conductance can be look-up from these curve tables and obtained using linear interpolation.

The switching coefficients and composite currents are both time dependent. Their values are calculated in the “modeling” phase when simulation has not even started. The obtained coefficients is a multiplier which will further scale the conductance calculated for IV data and thus stamped value. These scaling are such that when test load specified in the waveform section is connected, driver at the pin will reproduce exactly the same waveform data given in the model. As to C-Comp, it can be inserted using simulator’s existing infrastructure so the integrator there will manage the stamping and error prediction.

The more complicated portion of IBIS modeling inside a simulator is due to the options available for the end user, thus model developer must plan in advance. For example, the c_comp may be split across different terminals. Each waveform, IV or components have different skews which book-keeping codes must take care of. There might be added submodel for pre-emphasis or de-emphasis so the class implementation-wise one should consider “composite” pattern such that recursive inclusion can happen. At the end, this is a relative simple device to model for simulator, particular when comparing to the transmission line.


W-Element… Transmission line:

Every electromagnetic text book will give transmission line structure as shown below:

RLGC

This is an uniform distributed model and is implemented early in various simulators as  the “U” element. While implements T-Line model this way is now outdated due to the performance issue, it’s still how the T-Line’s raw data, frequency dependent tabular model, are given:

TabModel

The tabular model are field solved of Maxwell’s equations based on layer stackup, trace layout, material properties and sometime special treatment (like surface roughness) and finally presented as R/L/G/C data at low (DC), high (Infinity) frequencies and many points in between. Thus to model T-Line for a simulator to use, one has to convert these data to a mathematical form first which can then be used in either time or frequency domain. For transmission line, this can starts with Telegrapher’s equations.

By solving the KCL/KVL of a unit length RLGC circuit above, one can derive and find the telegrapher’s equation:

And the solution to this equations, as explained in the wiki link above, involve a wave propagation function Gamma:

RLGCEq2

When realize this in the system model, it as the Norton equivalent circuit form:

So on each side (near end and far end) of the transmission line, there are two components: Z (admittance) at that particular time step and current source due to the propagation delay originated from the other end. These two components (Z(s) and r(s)) can be obtained from the tabular data in frequency domain and then converted to integrate-able form in time domain so that they can be “stamped”. Generally, it includes the following steps:

  • Parse and store the raw tabular model;
  • Calculate the propagation delay and characteristic impedance using highest frequency data (or using extrapolation), these value will be used for interpolation later in time domain.
  • Construct the Z(s) or Y(s) and the wave function r(s) shown in the system model. As transmission lines are usually coupled, these curves are multi-dimensional in frequency domain;
  • Using vector fitting technique to represent this frequency domain functions using series of poles and zeros. In most of the cases, particular when the model data has insufficient bandwidth or low quality, exact fit is not possible with reasonable number of poles/zeros and thus best fit in the minimum-square-error sense needs to be performed.
  • Once pole and zeros are found, they can be converted into time domain as different order of terms. All these terms combined together will form the Y(t) or r(t) in time domain. Pade’s approximation may be used here.
  • During time domain simulation, use interpolation to find r(t)’s value in the past history (propagation delay ago) and use that data to construct the equivalent model of this end at this particular time point.
  • For frequency domain analysis, vector fitting and conversion to integral form is not needed. The Y(s) and r(s) data can be used directly for stamping at this frequency with some interpolation.

For the first three steps, I wrote a simple matlab codes to demonstrate how how they are done:

Impedance function:MatlabY

Propagation function:MatlabH

Plots:PlotY

PlotH

While the matlab codes above seems straightforward,  most simulator (including SPISim’s SSolver) will program with native codes (C/C++) for performance consideration. So a whole lots of matrix operation (inverse, eigen value, LU decomposition etc) will also come into play during the process.

It’s rarely the case that the developed model or codes will work the first try. With so many terms (of converted poles and zeros) for so many dimensions (coupled cases), it’s a daunting task to figure out what has gone wrong when waveform is not as expected. It’s often simpler to back to basic: check steady state solution first, use one line, no reflection with by matching impedance at the other end, use characteristic impedance to find nominal reflection value and so on to help identifying the issue:

TLDebug

Interested reader may find more details about SPISim’s implementation, same as HSpice’s, in the following paper:

“Optimal Transient Simulation of Transmission Lines” by Dmitri Borisovich Kuznetsov, Jose E. Schutt-Aine, IEEE Trans. on Circuit and Systems, I Feb. 1996

In terms of book, I have found that Chap. 5 of Dan Oh’s “High-speed Signaling” book, S6 in our reference book section, give best explanations among others. This maybe because Mr. Oh is from UIUC around the same time when the paper was published as well 🙂 It also worth mentioning that similar technique can be applied to other passive, homogeneous device modeling, such as the system channel. For example,  one common approach of checking and fixing casual issue of a s-parameter is by using vector fitting and convert to rational function form.

Simulator development: Abstraction

In previous post regarding simulator development, we mentioned that simulator at its core is linear algebra (with or without relaxation) solving matrices formed to describe netlist’s nodal cutset (KCL) and mesh loops (KVL). We also mentioned that the “hot-loop” of circuit simulation are the “solve” and “stamp” routines, i.e., device solve modeling equations at that particular dc point or time-step then put contents into the aforementioned matrix formation. So a lot of thinking needs to go into formulating these two steps such that simulator developed is stable, maintainable and extensible.

On the p170 of the classic “Computer Methods for Circuit Analysis and Design” book, stamping for basic elements are listed:

Stamp

So the first level of abstraction, also the main work of “Solve” routine within each device, is to solve the modeling equations using terminal conditions (i.e. voltage or current) in a particular iteration, then translate into corresponding I, V, Y (admittance), G (conductance) then put into the circuit matrix for simulator to solve. In addition, because Newton method requires first derivative to progress and find next possible root, the “partial” value (first derivative of matrix) also needs to be computed by the device model and provide to the simulator accordingly. Without this, simulator will need to perform numerical derivative (auto-partial) to call “solve” and “stamp” routine multiple times in order to find the derivative dV/dI, or dI/dV etc at that particular terminal conditions. This will result slowness and instability of the circuit simulation.

Each device, regardless how non-linear it is, may be “linearized” to simple equivalent circuit under certain condition. This “certain condition” can be fixed time point, or fixed terminal condition like voltage supply. That is, within each Newton iteration (thus only belong to that iteration and that time point), one may transform non-linear device model into a simple linear equivalent one. Mostly using Norton or Thevenin theorems:

EqCkt

As to how to represent a device model into such linear circuit depends on the device’s physics. In my mind, this is where (device) physics comes into play in the simulator development.

For example, for simple elements like R, V, I, one can simply “stamp” entries by the book. Control sources can also be considered as (controlled) conductance, admittance and “stamp” accordingly. Complicated devices such as transistor, transmission line or S-parameters certainly need some mathematical derivation in advance. Katzenelson algorithm may be used in some condition to solve PWL network. Even devices like L and C also needs special consideration, such as numerical integration and prediction.

LCDev

The derivative forms for C and L above show that there is no direct solution to find L and C’s conductance or admittance in time domain. So numerical differentiation approach like Backward Euler may be used to calculate conductance value based on circuit history, i,e, result of previous time steps. If this is a fixed-time step simulator, then task will be easier. A variable time step simulator will certainly need much more consideration: how big a time step can be taken, what is the integration or resulted differentiation error etc. Even within device level, such as transmission line and s-parameter, the device it self also must keep track of past history so that reflection from the other end will happen at the right time.  From the discussion up to this point, it should be convincing that the simulator development requires multiple disciplines.

CapCode

The second level of abstraction happened at the architecture level. There are only 26 English characters but there are much more for device types… some may be even custom made like antenna or macro circuits. So while elementary devices like R, L, C, I, V, E, F, G, H etc all have their own prefixes in the netlist, a mechanism must be in place such that the simulator can support more (some future) devices. This is mostly done using dynamic link library with predefined interfaces and access. The example below is API from Berkeley spice:

PortType

By defining these port types and access functions, the simulator limits the device’s accessibility to its internal structure and even matrices, thus can be more stable. At the same time, the defined interface also allows extensible for future devices. It is thus the device designers he or she needs to map the device under modeling to the limited, predefined interfaces such that the data can be used by simulator at the top and simulate accordingly.

After all these are sorted out, then the remaining part of the simulator development is to figure out physics of the devices, construct a model, realize that model using numerical techniques, solve and extract equivalent’s values at that particular time and iteration, and pass the data back to main caller functions then wait to see whether this solution converges for this iteration. If so, then perform book keeping either for future time step reference, or predict maximum time step simulator can take based on device’s limitation (e.g. break point in PWL sources or transmission line delay).

In SPISim’s SSolver, we reference the Berkeley architecture profoundly and focus more on the device modeling and integration. Existing spice does not have support of any devices required for system analysis, such as IBIS, Lossy coupled, transmission line, S-parameters. Even S-parameter extraction is also very tedious and limited to only two ports originally. While our experience in the past enables us to grasp the simulator architecture easily and build up functionalities much quickly, it is still respectful for us when reading the relative document and source codes when the Berkeley team developed such simulator in the first place several decades ago.

Simulator development: Architecture

Effective analysis methodologies and streamlined flows are built on top of core technologies. For system electrical analysis, these core technologies are mostly 2D/3D field solvers, circuit simulator and statistical processing engine. So far as simulator is concerned, HSpice by Synopsis is often considered as a golden reference. While it is more accessible for us in this part of the world, apparently it may not be the case for other areas, particular in Asia. To enable our customers for system analysis not bounded by the availability of HSpice, we embarked the journey of simulator development last year. As it comes to fruition with the release of SSolver in Q1/2016, we would like to share some of the thought process with the coming posts for readers who interested in how it works. Note that the context here is MNA based electrical simulator, mechanical and thermal etc disciplines are not included.

Circuit simulator is an art of combining computer science, physics and mathematics.

Each junior EE undergraduates learned that circuit analysis, in its most fundamental form, can be done with nodal analysis or mesh analysis. One can use KCL and KVL for the nodal cut-sets and loops in the circuits and form equations representing the circuit’s branch current and nodal voltage.


However, not all of the elements can’t be represented with pure voltage or current form. In order to “probe” voltage or current of particular node or branch, the combined analysis, modified nodal analysis (or MNA), is used. Nodal analysis is used as basis here because there are fewer cut-sets than mesh loops. So when writing all the equations into a matrix form, the dimensions of the matrix for nodal will be considerably smaller and thus more efficient for solving. With the matrix form, it’s thus clear that the circuit analysis is basically linear algebra… store and solving MNA matrix many many times. In my mind, this is where mathematics comes into play. All the matrix’s techniques will apply: sparse matrix, pivoting, conditioning etc. If the matrix is ill conditioned such that after certain iterations, the solutions can’t be found, then simulation does not converge. Is also often an insight simulator designer should place at this stage that how to feedback and relate matrix elements which cause non-convergence back to the original branch so that user may look into the model or connection of that device for further inspections.

While it’s easy to write a program to solve matrix and get a solution vector, it takes a lot more thoughts to do this efficiently during simulation. Without touching device’s physics modeling (yet), this is where knowledge from computer science may be very helpful.

There are many types of circuit analysis: DC, DC Sweep, Transient, AC small signal, Sensitive etc. For system analysis, we probably use transient (time domain) most. However, the most fundamental step for all these are “Newton Iterator“, that is using “Newton Raphson (NR)” technique to solve aforementioned matrix repeatedly until solution vector is found. In DC operating point phase, all models are static (e.g. capacitor is open and inductance is short). Several NR iterations later when DC solution is found, than AC model is used for small signal around this DC operating point or transient model is used to start marching into t > 0 domain. Within each time step, matrix is again consider static (respect to that time step) and many NR iteration will be performed. Nodal voltage will adjust during these iteration as tentative solutions changes, so the model’s physical response must also adjust accordingly. In some cases when DC does not converge, simulator will revert back to “Ramp” or “Charge up” in which all voltage/current sources starts from 0.0 (thus no branch current and nodal voltages are all 0.0), then gradually ramp up the value just like transient simulations.

DeviceType

Now there are also many different type of devices (see above), not all of them are non-linear or time varying. So to build an efficient simulator, they need to be architect to minimize function calls and thus matrix element change. For example, one may be able to classify devices into the following several types:

  • Not-time varying: e.v. dc source, whose value will not change during simulation
  • Time-varying:
    • Linear: e.c. PWL source, whose value will not change within that timestep
    • Non-linear: transmission lines, whose value will change in each iteration
  • Frequency dependent or non-frequency dependent

The purpose of this classification is to make matrix “stamping” (i.e. filling in the value) and solving as efficient as possible. These two steps are the “hot-loop” of the circuit simulation. We can then define device interface:

  • Parse: called only once per run, parse the netlist syntax;
  • Initialize: once per run, transfer texture data to counterparts for simulation
  • Model: before DC starts, construct physical model
  • Stamp: depending on device type, called once per simulation, per time step or per iteration
  • Solve: called during each iteration to solve for solution vector
  • Update: concluded and called at the end of the time step to prep for next time step
  • Request: to answer probing request and return device properties
  • Cleanup: clean-up the memory at the end of the run.

In objective-oriented language such as C++, these interfaces are realized as virtual functions to be derived and overwrite by the concrete device classes. In language like “C”, they are defined as struct of functional pointers and the derived class must overwrite and called in the same order to avoid pointer mis-alignment. There may be a predefined linklist at the simulator level which has all types of devices involved in the netlist, then simulator iterates each instantiated device within that link list at different time point or iteration to get updated value for NR matrix solving.

Also needs to be considered is the model placement: same models may be shared by many instances, thus it’s not efficient to have model created for each one of the instance. For example, many transistors may use same BSIM model, thus only the first device using this model need to initialize such model structure but not the rest. So at simulator level, separated linked list or hash map needs to be maintained for the model assignment as well.

Other considerations may include varying simulation timestep and new simulation without re-initialization. For the former cases, a predictor is used to predict error may happen if “Jump” to this time step. When actual solving find to much error due to this big jump, than backtracking to smaller time step will happen… so the book-keeping of old matrix should be at hand. Also, most simulator supports “.alter” type statements such that same netlist can be reuse  for new simulation with updated device values properties. Thus, the simulator or device designer must make sure that the simulation settings in previous run will not “contaminate” next run.

As one can see, these considerations needs to be think through when designing a circuit simulator. Other wise the developed simulator will easily become unstable and un-maintainable, let alone extensible. On the other hand, it’s also this kind of exercise and process which make a humble engineer appreciate the beauty of different disciplines of science and engineering work flawless to solve modern design and analysis challenges.

Interested reader can further explore more details in open source simulators such as Berkeley spice, and/or reference to the books recommended below:SimBooks

Simulate IBIS Data with Free Spice [Part 1]

Note:

Interested reader of this post may also want to follow up with the [Part 2] of same topic and try out the [Free Web App] which realizes this conversion flow.

IBIS to Spice:

Most of the buffer modeling flows focus on creating IBIS models from existing transistor buffer design, usually in spice format. However, we also find values in  flow of doing the other way around, namely converting IBIS model to spice format. This is motivated by one or more of the following reasons:

  • System SI/PI analysis support with free spice simulators: There are several simulators, e.g. Berkeley 3f5, eispice, ngspice, LTspice, available in public domain or free of charge. Due to historical reasons, their focus tends to be more on-chip or vendor products specific, like BSim3/4 for Berkeley spice and voltage regulator for LTspice. While they all have certain degree of transmission line support, yet when it comes to IBIS portion, they are totally lack of. Without driver model, which usually comes in the form of IBIS models, one can’t perform system analysis! It’s certainly possible to develop native IBIS support into these simulators, but the immediate available solution is to have a flow to convert existing IBIS model into sub-circuit like format and be able to simulated in these simulators. The added benefit of this approach is that engineer who has ad-hoc need to run SI/PI simulations with IBIS involved can do so quickly with these free available simulators without incurring much overheads.
  • Vendor neutral release of IBIS reference data: IBIS is a non-proprietary data format. When implemented correctly, simulation results from different simulator vendors should correlate with each other very well. To help achieving this, “golden waveform” data can be part of the IBIS model release. In reality, the “golden waveform” is optional and each simulator vendor’s implementation is different, thus the results may be different. We have seem model providers, such as Micron etc, also provide encrypted hspice as part of  the release to provide “golden reference” for the IBIS model. The disadvantage is that encrypted model needs to be run on proprietary simulator which is usually not free. So there is a value to be able to release IBIS, its corresponding data in non encrypted form AND allow user to validate the model with public domain simulator as well. This also encourages (simulator) vendor neutral model release.
  • Explicit IBIS algorithms implementation for educational purpose: There have been many papers and presentations detailing usage of IBIS data inside a circuit simulator. While it’s good for high-level overview, the truth is that these algorithms are often implemented deep inside a circuit simulator. With the developed Ibis to spice flow, we expose these algorithm in the form of plain text (versus C/C++/other programming language) spice compatible subckt format. We believe it will  be very educational and have much reference value.
  • Speed up flow development: Circuit simulator is one of the back-bone of SI/PI analysis (field solver can be one of the others).  To be able to use simulator as part of the developed flow, several options are possible: 1. choose to work with established simulator vendor and require customers to have license accordingly, 2. develop one internally, or 3. make use of tried and proven ones in public domain. Each of these approaches has their pros and cons. As a start-up company focusing on providing flows of high C/P (Performance/Cost) value, we would like to save the cost of other licenses and development efforts for our customers and speed-up the development when possible, thus option 3 is a very attractive solution to us.

There is already a vendor providing Ibis2Spice in their tool. Their free version supports only up to V2.1 IBIS model and the paid version only up to V3.2 IBIS model. Having that said, the model converted by their tool can’t be simulated in free spice directly. The flow we have developed can supports up to V5.1 model which includes the current information like [ISSO] and [Composite Current] keywords. In these two posts, we will explain about our flow in details. We will first review how ramp rate data can be used in free spice, followed by how waveform data can be converted into spice, accompanied with correlation data in both cases.

Goal of developed flow:

  • Run on free simulator, e.g. Spice3F5 and NgSpice
  • Support VT waveform data (IBIS V3.2 and up) and current data as well (IBIS V5.1 and up)
  • Produce very good correlation compare to commercial IBIS implementation.

Ramp based Ibis2Spice conversion:

In this first post, we will review the existing Ibis2Spice flow. We have also re-implemented this IBIS to Spice flow and release it free in our SPILite module. Output from our flow is directly usable in free NgSpice, which is also included in our tool. Basically, it uses ramp rate data only in the given IBIS model and creates a corresponding spice model. The learning here is how behavior source, ASRC (Arbitrary SouRCe) can be used to implement the IV table lookup. This technique will be applied more extensively in waveform based Ibis to spice flow (next post).

Searching from the web will bring you to this post (for original author’s credit): IBIS to Spice Translation (part 1). In this post, author describes the operation, his attempt to modified circuit and the result. He also provided an Awk script to accommodate the the changes needs to be made in order to run on free spice. As this post is written more than twelve years ago, part of the content has been outdated. For example, the NgSpice 26 does accept the syntax like  X + -3.12 so there is no need to convert to X-3.12 any more.

The part 2 of the original post show the schematic of the converted ramp-based spice circuit. It is hard to find on the web, so we post it below to save reader’s effort:

Ibis2Spice Schematic

The key elements here are four IV curve data: XPWRCLAMP, XGNDCLAMP, XPULLUP and XPULLDOWN. These four IV tables from original IBIS have been realized with ASRC sources, as explained in NgSpice manual:

Selection_195

The power clamp and ground clamp branches are always on, so the data is used directly. Their ASRC data is a converted PWL curve shown below. Depending on terminal voltage V(1, 2), current will be output or drawn from terminal 3 and 4.

Selection_199

For pull up  (PU) and pull down branches (PD), they are turned on/off only after buffer has switched, the rate of turning on/off is based on a RC constant (C1 and RB3 in the upper left of the schematic) converted from ramp rate value in the model. This RC value is then used to multiply the PU/PD voltage and finally converted to a current source using G element (VCCS, Voltage Controlled Current Source).

Selection_197

Selection_198

In the original post, author mentioned he has attempted to replace this RC based implementation with his PWL version yet get non-smooth results. We think this is because PU/PD branches are turned-on/off gradually. Only when they are left for certain period of time, static state will be reached. Thus a “time” based parameter must be present. Otherwise, static solution is solved at each time step and thus result will be incorrect. RC multiplier realizes this transition of “gradually” turning on/off the PU/PD branches.

With the RC based implementation, one can mimic the “ramp” data used in other IBIS capable simulator and produce good correlation, as shown below. Due to the simplicity of this implementation, the simulation speed is very fast.

Selection_201

Note that with this implementation, drawing current from VCC/VSS are way off. This is also indicated in the original post. As a result, this approach will not be useful for SSN simulation which includes PDN noise. Further more, it will not capture initial undershoot, final overshoot and other more subtle waveform presented in real buffer switching, also the RC curve (shown in the red above) is not true “linear”. In additional to the ASRC based implementation for IV tables explained above, part of the converted circuit is used to detect and convert input analog signal into digital ones. Lastly, each corner of the model to be used in the simulation needs to have a spice subckt library converted from corresponding corner in original IBIS model.

This post is written in preparation for the upcoming IBIS Summit at DesignCon 2016, where we will present this Ibis to spice flow. Please see the [Part2] and download presented slides and associated example files.